Monday, February 28, 2011

How to Make a Flower

So I love making things that will embellish an item to make it look that much more special....  And these flowers are so easy and will add just the right touch to any project that will make it look like you got it from a high end boutique..... so this is what you do......

First off find the right fabric. Test a small part of the fabric with a lighter to make sure you can burn the edges... Once you found it you are good to go. 
Cut out shapes that look like peanuts or the number 8 (see picture below)... you can make these skinny or fat or long or short... it's really up to you on what kind of look you are going for.... you can also do just a few  of every size or you can go crazy and make it a really full flower.... I did about 4-5 petals of each size and I made four differt sizes.... obviously each size is just a tab smaller than the one before... (see picture)
Next.... I made a thin ribbon like strip of the fabric and I just twirled it together till I made a small rose like bud... This is going to be the center of your flower. Hold the bud together..... Now simply take the flame and slightly singe the edges. You will notice that the edges become somewhat stiff and will now hold in place. I decided to singe the back of the bud as well so that way the back held into place...
Then I took every petal that I cut out and I singed the edges as well... You will notice that the edges will curl slightly.... (This is a good thing)

Here is what my Bud and petals looked like when I was done singing the edges.... (see picture below)

Then take two petals at a time and sew them together... Make sure you start with the smaller petals and hand sew them onto the bud.

As you add more petals make sure you rotate them and  put them in the empty spots... "fill in all the windows"
After you have all the small petals sewn on start adding the larger ones till you have all the petals sewn on. You can even add a leaf if you desire.

Hooray! You now have an absolutely beautiful flower that will look gorgeous on so many different things.... I made this one for our soon to be Baby London's first Sunday dress. ( I will post the dress in the next few posts... its still a work in progress) and I made an extra flower so I can tack  it onto a headband so I can cover up that sure to be bald head she will most likely have.


P.S:   Here are the two different flowers... The one on the right I did with longer and wider petals and I added a lot less.... The one on the left (is the one in the tutorial) I made a whole bunch of petals. They were also smaller and skinny so the flower came out pretty full looking compared to the other... I did this so you can see the difference it can make just from the way and the amount of petals you cut out. I love both the looks.  But you decide what look you like. And of course they can always be even more extreme. Happy Crafting!

Sunday, February 27, 2011

A Few Things I made....

I am going to be doing step by step on how I create things... But i wanted to give you a feel of what this blog is going to be about.... I am going to be making and creating new things from old. My favorite thing to do right now is to sew clothes for my little girl out of my old clothes. instead of throwing them away when they get a hole or a small stain or just when i simply just get bored of them (which happens more than id like to admit) I decided to start designing my own clothes for Reagan... I have a hard time with all the little girl clothes out there. A lot of clothes they have for babies and toddlers look like pajamas.... or are all just so pink .... just not my style. Then I see all these adorable clothes at boutiques and high end stores that cost an arm and a leg...I looked at them and I realized that I could easily make them. so I did.

I don't like patterns.... they frustrate me... they never seem to be the right size.... so i just started making my own patterns up. I just go for it. 
I just love this picture we had done of my little Reagan wearing the shirt and skirt  I made her.....  This little outfit I made Reagan was out of a few old things... The brown shirt is an old shade shirt of mine that the hem came undone.... I cut it simply into a pattern that looked similar to the shade shirt  but the sleeves were a little more "cap" and the neck line a little higher... then I added some extra lace that I had laying around and scrap material that I had from the skirt material twirled into a rose.

The Skirt I made the under layer out of an old Halloween costume I made years ago....
And the lace I got from an ugly dress I got at the Thrift store for $1 that I obviously didn't like... but loved the lace.  I simply made a strap waistband and then cut a long rectangle  about 4 1/2 times her width and made a basting seam that i pulled to scrunch the fabric till it fit the waist band and just sewed them together.. I made a simple fabric loop button hole and voilĂ ... a whole outfit for $1...


DIY Play Kitchen

Old Antique Play Kitchen - Check
One Candle - Check
Dark Brown Paint - Check
Sponge brushes - Check
Sand Paper - Check
Crystal Door Knobs - Check
One Hunk of a husband (optional)  - Check

 I LOVE the Thrift store.... specifically Dessert Industries.... in fact... if I am looking for something fun to do to get out of the house... D.I. is most likely where I will go. Of course I usually have to do it while my husband is at work. He is not a fan like I am... in fact he will go into the store and within the first 10 minutes he will already be asking when we are going to leave... but for me Thrift Store shopping is relaxing and so exciting at the same time... Its amazing the things you can find. I have decorated our whole home from Thrift Store finds... (all of which is in storage at the time.)  You just need to have an eye for things and  or learn how to picture an item either repainted, refinished or even just imagine them out of the thrift store atmosphere..... If you can do that....you can find so many many treasures... and above all save A LOT of cash money!

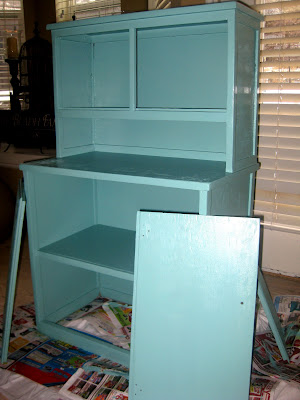
For example... I wanted to get my little Reagan a Kitchen set for Christmas but everything I saw was either too cheap looking or just outrageously priced.... So for me this $9 beauty was a gold mine to find at the thrift store..... I'm sure a lot of you might be saying to yourself that this play kitchen is a mess and is in no way a  beauty..... This antique play Kitchen has been through A LOT as you can tell... and I quickly found out it had been through close to 5 different paint jobs... and the last one looks as if the kids did the painting them selves.... so on the outside you would be right,.... but I could see right through all the abuse and it was exactly what I was looking for..... let me show you what I was able to do.

I first started by sanding off all the horrid paint... well... actually my amazing husband was so good to do this for me... I am such a lucky girl.
I then took the brown paint and I painted all the edges... I did this because this is where I was planning on "distressing" the wood. I obviously didn't take the time to do it nice and neat because I was simply going to be painting right over it.

Opps! I forgot to take the pictures of me waxing the Kitchen... But I'm sure you can use your imagination.... All you do is rub the candle along the edges or any place you would like "distressed" and then you apply two coats of paint.
When the paint is dry take your sandpaper and rub along the edges where you rubbed the candle. The paint will not adhere to the wax so you have that perfectly distressed look that people pay so much money for... but it was so easy to achieve.
 I will later make a post about all the accessories that I made and added to this kitchen.
Reagan LOVES it and plays with it all the time. Her favorite thing to do is make me soup.  It was so much fun create... It was a lot of work... but it makes it all worth it is to see just how much she loves it and just knowing that I did it.

Let it Begin....

 So I have been told many many times by people that I should start a blog with all the crafts and sewing I do. I have been able to battle off the idea with the fact that I am always busy... I love doing crafty things... especially creating something new out of something old but I thought that starting a blog would turn it into more of a chore that a hobby.... I have said that I just don't have the time or even motivation that i felt I would need to actually create a blog worth reading.... I will never be able to tell anyone why I feel that now....when I have a super energetic almost two year old.... while I am 8 1/2 months pregnant.... When I feel my life is more chaotic then it has ever been... Why is it that I feel that NOW is a good time to start my Blog. Maybe I finally just run out of excuses....... I guess I shouldn't question myself and just do it.
SO..... Here is the very first post.... to hopefully many many posts that are to come of all my crafts and sewing projects. Hopefully this is going to inspire someone to pull out that dusty sewing machine, recycle old things and to start creating a little more.